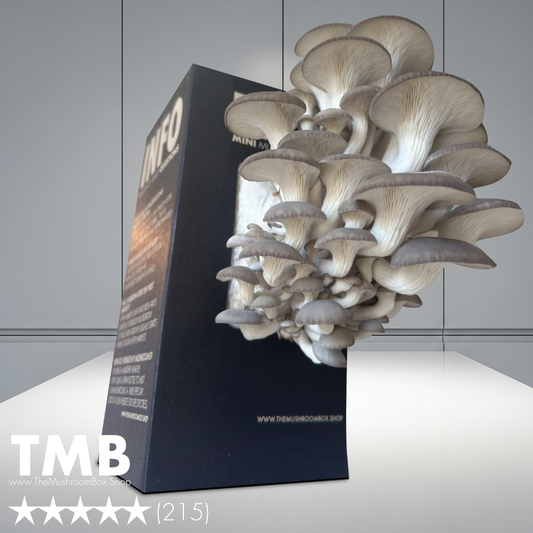
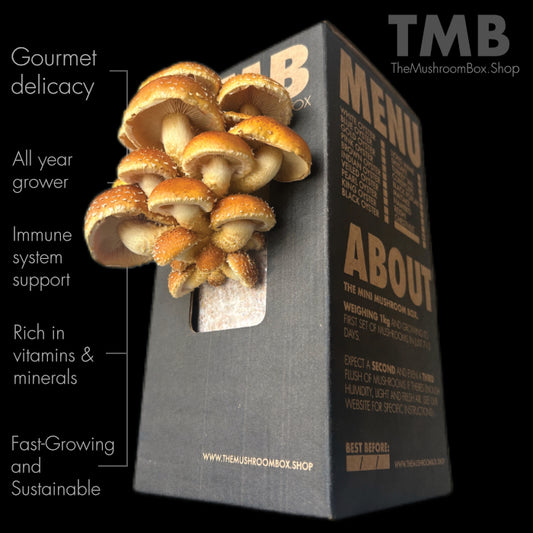
Description
The Mushroom Box
| Questions | Answers |
|---|---|
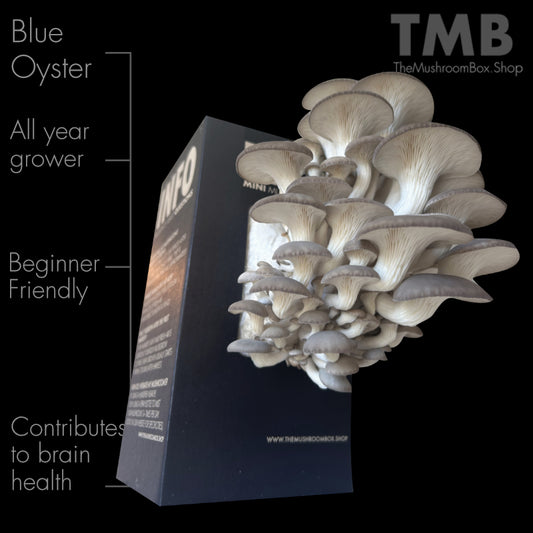
| Skill Level | Begginer |
| Grow locations | Indoors |
| Grow Speed | 2 weeks approximately |
| Kit Shelf Life | 6 months - Refrigerated (Don't refrigerate pink & gold oysters) |
| Asking for help | Join our facebook community (link in instructions blog) |
| Guarantee | No mushrooms?We'll send you store credit for a free replacement. |
Relevant Information
Growth Phases
First day of growth
After cutting the opening, the mycelium can brethe fresh air, a signal to start growing mushrooms.

3rd day of growth
Your mushrooms will start to rappidly grow, once they're a bit larger than the middle image, you can harvest and eat them!

6-7th Day of growthThe rate of growth will depend on the temp/environment.
The rate of growth will depend on the temp/environment.
At this point, your mushroom is fully formed! We do not advise leaving it beyond this point because they will drop spores and break down quickly!
Harvest the whole cluster & allow 2-3 weeks for the next flush to start.

Storing
If you're not ready to use immediately, your grow Kit can be refrigerated for up to 6 months.
Disclaimer: Pink & Gold oysters CANNOT be refrigerated because they're summer varieties. Keep them in a cool dark cupboard for best results.
Cooking
each mushroom unlocks unique medicinal culinary possibilities. To discover delicious dishes perfect for today's celebration, from smoky mushroom burgers to our incredible crumbed mushrooms with garlic sauce, explore our full collection of recipe resources and start your growing adventure!
DIY Mushroom Bucket

Turn 1 Box into a 10kg Farm!
Ready to level up?
Here's how it works:
Made for ambitious growers who're willing to put in a little extra effort for a massive reward.
This DIY kits are designed to show you how to transform a single 1.1kg Mushroom Box into a huge 10kg bucket farm, capable of producing an incredible 7-10kgs of fresh, gourmet mushrooms over two months!
What's included:
1x 10kg Bucket
A bag of chopped straw
Hydrated lime (for the recommended cold pasteurizing method)
1x fully colonized Mushroom Box of your choice
A sharp tool to punch holes in the bucket
(If using the hot water method, you will need a large metal pot and boiling water instead of lime)
If you've mastered our beginner boxes and are dreaming of bigger, more bountiful harvests, this is your next step.
Cost-Effective: This is the most economical way to produce a continuous supply of gourmet mushrooms.
The Ultimate Project: Experience the deep satisfaction of a larger-scale cultivation project from start to finish.
Continuous Harvest: Enjoy harvesting fresh mushrooms for up to two months straight.
Cautions and considerations
Eating Your Mushrooms:
Always cook your homegrown mushrooms well before eating.
When trying a new type of mushroom, eat just a small, cooked piece first to make sure you don't have an allergy.
About Mushroom Spores (A Fine Dust):
As mushrooms get bigger, they release a fine dust called spores. This is normal and how they make baby mushrooms.
This dust can sometimes make people cough or sneeze, especially if they have allergies.
To be safe, keep your mushroom kit in a room with good airflow, like near a window.
You can also pick your mushrooms when they are still young to have fewer spores in your home.
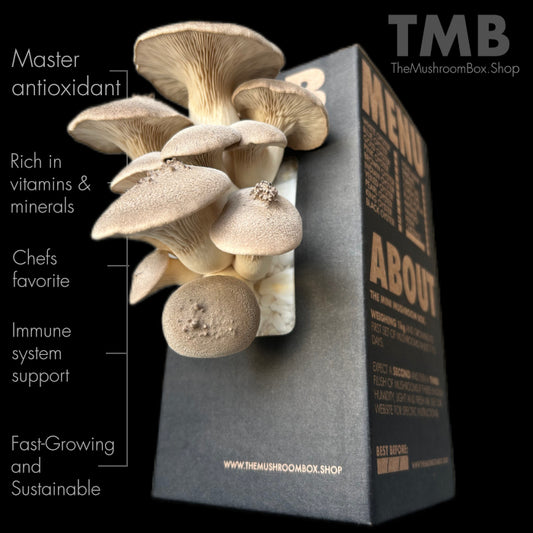
Health Benefits
The mushrooms you grow at home aren’t just fresher — they’re healthier and more powerful than anything you’ll find on a store shelf. Packed with plant-based protein, essential vitamins, minerals, and antioxidants, these exotic varieties help you:
Stay focused and clear-headed throughout the day
Build a resilient immune system that works with you year-round
Support a healthy gut and better digestion
Enjoy natural energy and vitality — without the crash
When you harvest straight from your Mushroom Box, you’re getting mushrooms at their peak nutrition and flavor — a rare combination of food and medicine that connects you back to nature.
Your Complete Guide to the Mini Mushroom Farm
Welcome, grower! This guide will walk you through every step of setting up and enjoying your Mini Mushroom Farm.
Step 1: Finding the right spot
Think about where mushrooms grow naturally: in a forest, under the shade of trees, with access to fresh air, humidity, and subtle light, all while protected from wind.
Your kitchen counter or a spot on a shelf can work perfectly to recreate this environment.
We also provide a mini mushroom farm setup which is designed to help you simulate that ideal forest environment anywhere.

Step 2: Setting Up Your Grow

Cut Your Boxes: The first step is to cut the opening on the front of your mushroom boxes with a clean blade for your mushrooms to emerge.
They will breathe in fresh air which is a signal to start growing within the next 1-21 days.
Recommended: Arrange your boxes inside the grow tent & give the inside walls of the tent a good spray with water, and then zip the tent closed with the boxes inside until you can see the mini mushrooms popping through.
Step 3: The Growing Process

Now, we wait. It can take anywhere from 1 to 21 days for the first tiny mushrooms (we call them "pins") to emerge.
It's completely normal for different mushroom boxes to start growing at different times, so be patient!
Growth Spotted! What Now?
As soon as you see mushrooms visibly growing from your box, it's time for two important changes:
Fresh Air is Key: Open the front flap of your tent fully and keep it open, along with the side windows. Fresh air exchange is super important and allows your mushrooms to expand nicely. The tent should remain open for most of the growing time from this point on.
Turn on the Humidifier: Place the humidifier near your boxes and turn it on.
Make sure the humid air can flow out of the open tent—trapping all the humidity inside a zipped-up tent now will cause more damage than good.
Step 4: Harvesting Your Mushrooms

Once your mushrooms are at their peak, you must harvest them immediately. If you wait too long, they will start to release spores, which causes them to lose their delicious flavor and medicinal benefits. They can dry up within a matter of hours, so harvest on time!
To harvest, we recommend twisting and pulling the whole cluster off in one go.
Step 5: Allowing for another growth

Another set can grow from the same opening but we recommend taping up the initial hole, spinning the bag 180 degrees in your box & cutting a new opening for the next flush to begin.
After your first harvest, the mycelium needs some time to regain energy to grow again (roughly 1-21 days).
During this resting period, we recommend leaving your tent zipped up and keeping the humidifier off.
Once you see new mini mushrooms emerging, simply turn the humidifier back on, open the tent & windows for fresh air and watch the magic happen all over again.
This might be a good time to order a refill of mushroom boxes to keep your farm going.
Step 6: Planting the mycelium

When your mushroom box has given you all of its flushes and stops producing for more than 4 weeks, the journey isn't over.
Break up the spent mycelium block and bury it in your garden near a tree stump or under some wood mulch.
This will help enrich the soil for your plant life, and with a little luck, with enough moisture and shade, you might even see more mushrooms growing in your garden in the future. It’s the perfect way to complete the cycle and spread the mushroom magic.
People Also Bought
![[Pre Order] Lions Mane Mushroom Capsules (60) | Brain Booster | Enhance focus | 500mg](http://themushroombox.shop/cdn/shop/files/ChatGPT_Image_Aug_31_2025_09_52_29_AM.png?v=1757059665&width=533)
![[Pre Order] Lions Mane Mushroom Capsules (60) | Brain Booster | Enhance focus | 500mg](http://themushroombox.shop/cdn/shop/files/lionsmane_review_b048da5b-ecdc-4dc6-90de-ca660d8456f7.jpg?v=1757441087&width=533)
[Pre Order] Lions Mane Mushroom Capsules (60) | Brain Booster | Enhance focus | 500mg
R 499.00 ZAR
R 350.00 ZAR
![Brain Booster - Lions Mane Mushroom Box [Pre order]](http://themushroombox.shop/cdn/shop/files/LM_Kitchen.jpg?v=1757101589&width=533)
![Brain Booster - Lions Mane Mushroom Box [Pre order]](http://themushroombox.shop/cdn/shop/files/LM_PRODUCT.jpg?v=1757101589&width=533)

![Cool Climate 4 pack: 2 King + 2 Blue Oyster [20% OFF]](http://themushroombox.shop/cdn/shop/files/BO_KO_Lifestyle_1800px.png?v=1752184605&width=533)
![Cool Climate 4 pack: 2 King + 2 Blue Oyster [20% OFF]](http://themushroombox.shop/cdn/shop/files/the_mushroom_box_reviews...png?v=1758867582&width=533)